This QuickBooks price levels guide offers step-by-step instructions for turning on and creating price levels.
Discover the power of QuickBooks price levels and learn how to effortlessly adjust prices and create custom pricing strategies in QuickBooks Online. This step-by-step guide provides detailed instructions on activating price levels and creating personalized pricing structures for your business.
Table of Contents
Whether your small business sells products or services, you might sometimes want to offer sales and discounts as incentives. With QuickBooks Online, you can make these price adjustments automatic, set them up to run for a specific time period, and extend the adjusted price to all your customers or just a certain segment.
This QuickBooks price levels guide offers step-by-step instructions for how to turn on QuickBooks Online price levels, plus how to create a price level.
» MORE: QuickBooks for small business: Which version do you need?
How to turn on QuickBooks price levels
Before getting started, its important to note that the QuickBooks price levels function is available in the QuickBooks Online Plus and Advanced plans only. It isn’t offered in QuickBooks Essentials, QuickBooks Simple Start or QuickBooks Self-Employed.
When working with QuickBooks Online Plus or Advanced, you have the option to create price levels. To do so, you’ll first need to turn QuickBooks price levels on.
-
Navigate to the gear icon on the toolbar.
-
Select Account and Settings.
-
On the left-hand side, navigate to the Sales tab.
-
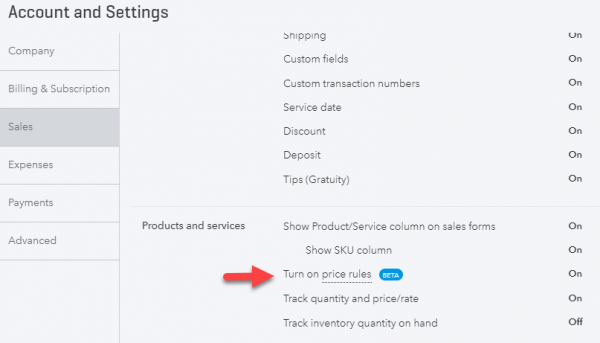
Under the Products and services section, check the box next to Turn on price rules.
-
Save and close.
Here is an example of the screen to turn on QuickBooks price levels:
While it says Beta next to price rules, you dont need to be concerned — the price levels function works great as-is. It is worth noting though, that price rules — or price levels, don’t impact reporting. In other words, you cant run a report specifically on sales affected by QuickBooks price levels.
Once you have successfully turned on the QuickBooks price levels setting, youre ready to create a price rule.
How to create a price rule with QuickBooks price levels
Now that your QuickBooks price levels is on, there are a few different ways to create a price rule. Heres one option:
-
Navigate to the gear icon on the toolbar.
-
Select Lists, then All Lists.
-
Select Price Rules, then New price rule.
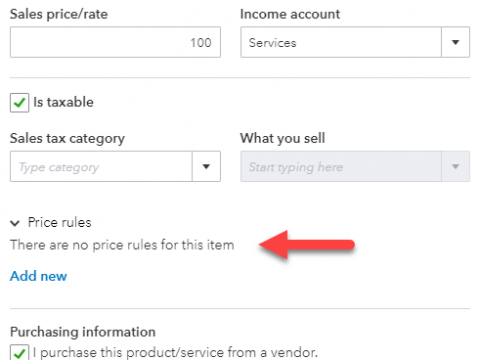
You can also create a price rule by navigating to the Products and Services list and then selecting the drop-down arrow next to the More tab. Alternatively, QuickBooks price levels can also be accessed from the edit item record function.
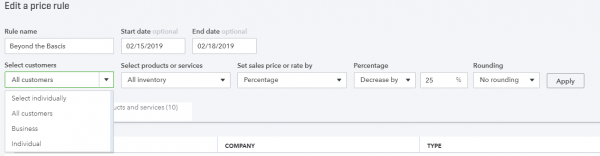
From here, you can name the price rule and select a start and end date (if the promotion is only for a limited time).
Additionally, you have the option to select the customers who will get the new price level. You can select all customers, but if you only want specific customers to have access to the new price level, it must be specified.
If you assign products and services to categories in the items list, you will also be able to filter the price level by product category to more easily apply price levels to the applicable products.
You can set sale price or rate by either a percentage, a fixed amount or you can set a custom price per item.
There’s also the option to round the amount to the nearest increment or leave it as-is.
Here is an example of a sales receipt for a product with an active price level. Note the default sales rate of $100 and the $75 rate due to the price rule (called Beyond the Basics in this instance).
Its important to note that this is the visibility youll have as the one sending the invoice. The customer will see the price of $75 on their invoice, and any report on the sale will show $75, not $100. There is no reporting specific to QuickBooks price levels or price rules by customer at this time.
» MORE:
Creating a customer type for QuickBooks price levels
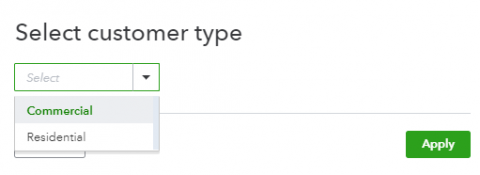
You can select specific customer types who will be able to access the new price rules if you don’t want all customers to receive the discount or sale price.
Even if you never plan to use QuickBooks price levels, it may be worth turning it on just for the ability to create customer types. This is because you will then be able to run a sales by customer type report — segmenting out your customer list — which can be a beneficial insight for your business.
To create a customer type:
-
Select Sales from the left-hand menu.
-
Select Customers.
-
Select the Customer types button next to the New customer button.
-
Choose New customer type.
-
Label your new customer type as you wish.
-
Save.
Once this customer type has been created, you can edit each of the existing customers and assign them to their respective customer type.
You will find the Customer type field in the Additional Info tab inside the Customer Info window.
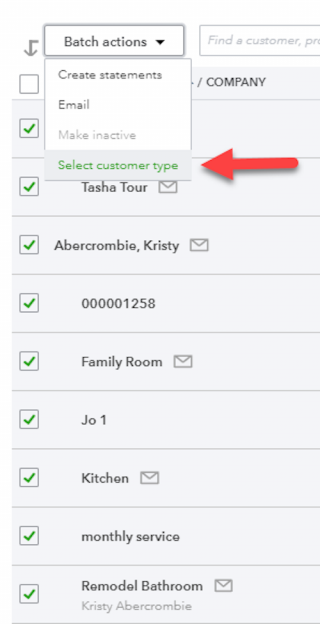
If you dont want to edit and assign customer types to customers one by one, you can also assign customers to specific types in batch.
Once customers are assigned to different customer types, you can designate QuickBooks price levels to be applied to certain customer types only. This way, the customers who you want to receive the altered price will automatically be eligible, while those not in the specified customer type won’t be aware of any price changes.
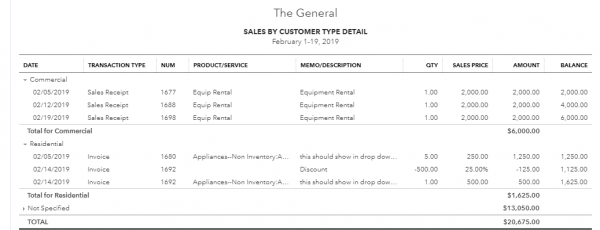
An added bonus of creating customer types for QuickBooks price levels is that you can then run reports specific to customer types. Simply select the Sales by Customer Type Detail under the Sales and customers section.
A version of this article was first published on Fundera, a subsidiary of NerdWallet.


Thanks to Source
QuickBooks price levels